HOME | ABOUT | CONTACT |

Search

Custom Search
Showing posts with label New Blogger. Show all posts

Saturday, February 23, 2013

How to Add a Top Sidebar to a Minima Stretch Template for New Blogger?

This blog is using Minima Stretch template. I have customized the look of this blog a lot. Now I want to add a top sidebar to this template. How can that be done? Actually it is not so hard than I thought. The following steps describe how I've accomplished this task.

  • Always backup your template before you do anything. Go to http://www.blogger.com/home. Click on a down arrow that will show more options. See the screenshot below:
  • A list of choices will show up. Click on Template. See the screenshot below:
  • It will lead you to the next screen. On the upper right corner, click on Backup/Restore. See the screenshot below:
  • Next a popup window will appear. Click on an orange button Download full template to save your file to your PC. See the screenshot below:
  • After that close the popup window. Next click on Edit HTML. See the screenshot below:
  • Another popup window will open. It will allow you to edit your html. See the screenshot below:
  • Next hold Ctrl and hit F at the same time to bring up a search bar. Type #sidebar-wrapper { in the text field to find the following code:
    #sidebar-wrapper {
    width: 160px;
    margin-right: 15px;
    float: right;
    overflow: hidden; /* fix for long non-text content breaking IE sidebar float */
    }
  • Next add the following code above it. See it in red below:
    #topsidebar-wrapper {
    width:330px; //pick your own width here
    float: top;
    overflow: hidden; /* fix for long non-text content breaking IE sidebar float */
    }


    #sidebar-wrapper {
    width: 160px;
    margin-right: 15px;
    float: right;
    overflow: hidden; /* fix for long non-text content breaking IE sidebar float */
    }
  • Then hold Ctrl and hit F at the same time again. Type <div id='sidebar-wrapper'> in the text field to find the following code:
    <div id="sidebar-wrapper">
    <b:section class='sidebar' id='sidebar' preferred='yes'/> </div>
  • Add the following code above it. See it in red below:
    <div id='topsidebar-wrapper'>
    <b:section class='sidebar' id='topsidebar' preferred='yes'/> </div>

    <div id="sidebar-wrapper">
    <b:section class='sidebar' id='sidebar' preferred='yes'/> </div>
  • Finally click on an orange button Save template to save it. See the screenshot below:
In order to understand the above steps, you must read How to Expand Your Minima Strech Template? before you apply these steps. Otherwise some parts maybe confusing and you may not understand it. Anyway would you like to add a top sidebar to your Minima Stretch template? Tell us why or why not in our comment section.

Saturday, January 31, 2009

How to Add Recent Posts and Comments Widgets to Your New Blogger?

I saw many Blogger blogs implementing a recent post widget and a recent comment widget on their blogs. I know WordPress blog allows you to just click to add them to your blog easily. For Blogger these functions are not yet available. So how can you add them on your Blogger blog?

This article, Easy Peaky Recent Comments Widget for Blogger Layouts, shows the way of how to add a new recent comment widget to your Blogger blog. I've just added mine. What do you think? The codes also added a new recent post widget to your Blogger but the author didn't cover that part. So here is how you can make this new recent posts widget appear by adding the Feed URL for it. After you log in to your dashboard, click on Layout/Edit for Recent Posts widget. A screen will show up. See the screenshot below: Recent PostsYou need to add http://yourblog.blogspot.com/feed/posts/default in the Feed URL. Make sure you change yourblog to be your blog name. Then click on SAVE to close it.

I've also fixed the indentation so that all post feeds line up nicely on the left side. In the codes provided above, there are two <ul>s, two </ul>s, two <li>s, and two </li>s. Change <ul> and <li> to be <p> and change </ul> and </li>to be </p>. That will do the trick. So far the only thing I don't like about is its default number of feeds that are limited to 5 only. I'll try to find a solution for this later. So please bookmark this post and check back for my update. Your questions and comments about this topic are welcome.

Saturday, January 3, 2009

New Blogger Comments and Backlinks - Do Follow?

I lately changed my new Blogger's comment from 'nofollow' to be 'dofollow'. What is 'nofollow' and 'dofollow'? Well, 'nofollow' is an attribute of HTML tag that will stop search engines to follow the link you've left in the comment section. That means you will not be benefited as a one-way link to your blog/website. 'Dofollow', on the other hand, is opposite. Your link would be treated as one-way link. Search engines will follow your link and crawl it. The more one-way links point to your blog/website, the more important the search engines will consider your blog/website to be. Thus it will increase your pagerank.

Although applying 'dofollow' might not be good to your blog/website in terms of pagerank, I see the potential benefits behind it. This will encourage more people to leave comments in your blog/website, thus search engines will pick up some long tail keywords for your blog/website. This implies that your blog/website will get more organic traffic from search engines. As we all knew Google's new Blogger has built in 'nofollow' attribute in its system. If you like to change yours, it is pretty easy to implement it.

  • Click on Layout/Edit HTML. Back up your HTML before you start. See the screenshot below: Layout/Edit HTML/Backup Template
  • Tick to expand your HTML. See the screenshot below: Expand Widget Template
  • Find the following codes from your HTML editor. You can hold Ctrl and hit F at the same time to bring up a search box, then copy and paste respectively the following line to find them. The first one is for the commenter's url and the second one is for backlink's url:
    <a expr:href="data:comment.authorUrl" rel="nofollow"><data:comment.author/></a>

    <a expr:href="data:backlink.url" rel="nofollow"><data:backlink.title/></a>
  • Change these two rel="nofollow" to be rel="follow" respectively or delete the whole thing because no attribute in HTML has the same effect as 'dofollow'
  • Save your template by hitting SAVE TEMPLATE button.
Will you change your blog/website to be 'dofollow'? Why or why not? Please leave your comments below.

Related article:
How to Make a Self-Hosted WordPress Blog DoFollow?

Saturday, December 6, 2008

How to Fix Duplicate Title Tags in Your New Blogger?

Lately I checked this blog's stats in Google Webmaster Tools account and found out that one comment has duplicate title tag with its original post. This is one of the drawbacks with New Blogger. Meanwhile Blogger has no offer of how to fix the problem. Having duplicate title tag is bad because it is not search engine friendly. Search engine such as Google will penalize your blog/website for having duplicate title tag. So I've been searching an answer for it on the Internet. Here is the solution that I've found for it:

  • Click on Layout/Edit HTML. Before you attempt to make any change, make sure you download your template by clicking on Download Full Template. See the screenshot below: Layout/Edit HTML/Backup Template

  • Tick Expand Widget Templates which is on top of the HTML editor. See below: Expand Widget Template
  • Search for the following codes in your HTML editor. You can hold Ctrl and hit F at the same time to bring up a search box, then copy and paste the codes to find them:
    <span class="comment-timestamp">
    <a href="data:comment.url" title="comment permalink">
    <data:comment.timestamp>
    </data:comment.timestamp></a>
    <b:include data="comment" name="commentDeleteIcon">
    </b:include>
    </span>
  • Replace the above codes with the following codes:

    <span class='comment-timestamp'>
    <script type='text/javascript'>
    document.write("&lt;a title='comment permalink' href='");
    </script>
    <data:comment.url/>'>

    <data:comment.timestamp/>
    <script type='text/javascript'>
    document.write("&lt;/a&gt;");

    </script>
    <b:include data='comment' name='commentDeleteIcon'/>
    </span>
  • Save your template by clicking on Save Template button which is at the bottom of your HTML editor.
The reason this method works is that it uses javascript. Search engines do not like javascript and will not crawl and execute its content. Thus comment will be treated as part of its original post.

I've just implemented this method with this New Blogger blog. I'll report back how it goes.

Update as of 12/15/2008: Good news. Today I log in to my Google Webmaster Tools account and click on Diagnostics/Content analysis, all my duplicate title tags are gone!

It says, "We didn't detect any content issues with your site. As we crawl your site, we check it to detect any potential issues with content on your pages, including duplicate, missing, or problematic title tags or meta descriptions. These issues won't prevent your site from appearing in Google search results, but paying attention to them can provide Google with more information and even help drive traffic to your site. For example, title and meta description text can appear in search results, and useful, descriptive text is more likely to be clicked on by users. More information"

So it's proven that the above method works.

Related article
Duplicate Title Tags/Meta Descriptions

Saturday, October 11, 2008

Submit New Blogger Sitemap to Google Webmaster Tools Account

If you like Google to find your blog/website for indexing, then it is better that you submit it to Google Webmaster Tools account; and it is Free. I have submitted all my blogs and websites to that account. It provides detail report about the visibility of your pages on Google. Features such as Overview, Statistics, Links, Sitemaps, and Tools are very useful for studying your blog/website. You can trace any error from these features and try to fix it.

My only problem I have so far is with the New Blogger sitemap submission. If you submit it as http://yourblogname.blogspot.com/atom.xml to Google Webmaster Tools account, then it only shows the maximum URLs of 22. However I have 59 URLs. Does it mean the rest of my URLs are not going to be indexed on Google? I searched the web and found this post Submit Your Blogger/FeedBurner Sitemap to Google Webmaster Tools that has solved my problem. After I submitted this blog as http://meaningfulblog.blogspot.com/atom.xml?redirect=false&start-index=1&max-results=100, now it shows all my URLs on Google Webmaster Tools account. Just an useful blogger tip that I want to share with you.

Related articles
Sitemap? What is it? How to Add it to Our Website?
How to Add Google Sitemap to WordPress.com Blog?

Saturday, August 9, 2008

A Drop Down Menu for Your New Blogger

Want to have a drop down menu for your New Blogger? I've just implemented it on this blog. Check it on the right siderbar. It will save a lot of space for your blog/website. The following blogs/sites provide resourceful information that you can learn to implement drop down menu for your New Blogger:

Now go ahead and create your own drop down menu. Enjoy blogging!

Saturday, August 2, 2008

Translate Your Blog/Website in Different Languages - Part 2

Last week I wrote Translate Your Blog/Website in Different Languages - Part 1; and I promise you that there is an update for it. Here I am going to provide you more languages with their related country flags. You can just add the following codes to the end of the codes you've got last week or just incorporate them the way you like.

Hope you find this post useful. Check the outcome of the different country flags on the right side bar. I just added to the end of the codes I'd got last week. Any questions, you know where to ask.

Relate article
How to Implement Google’s Translation on WordPress.com Blog?

Saturday, July 26, 2008

Translate Your Blog/Website in Different Languages - Part 1

Why do you want to translate your blog/website in different languages? I know it is the fact that people from all over the world will search in Google, Yahoo!, MSN or other search engines and they might find your blog/website not in their native language. How can they understand what your contents are all about? Therefore, it is necessary that you provide them a translation tool so that they can translate your blog/website by simply clicking on their corresponding country flag.

You can get a Google Translator Widget here. So far this widget can translate your blog/website from English in other ten languages: Arabic, Chinese, French, German, Italian, Japanese, Korean, Portuguese, Russian, and Spanish. After you've got the widget code, following the steps below to implement it in your New Blogger:

  • First login to your Blogger's Dashboard.
  • Second click on Layout.
  • Next click on Add a Page Element.
  • Then a new window will pop up.
  • Find HTML/JavaScript and click on Add to Blog.
  • A new window will just pop on top of the other one.
  • Put the code you've got earlier in the content area and give a title if you wish.
  • Click on Save to save it.
  • Move the widget wherever you want it to be
  • Finally click on Save which is on top of your New Blogger's layout.
I'll add more languages to this widget in the future. So bookmark this post and come back to check my update. Your comments are welcome.

Update: Read Translate Your Blog/Website in Different Languages - Part 2 to find out the more codes of the languages and their corresponding country flags I've made for you.

Update: If you are using WordPress.com as your blog platform, find out how to implement it from this post: How to Implement Google’s Translation on WordPress.com Blog?

Related article
Add Language Translation to your Website - Tutorial

Saturday, July 12, 2008

Embedded Comment Form for Your New Blogger

Great news!!! If you are using Blogger as your free blog platform, now you can get a new feature: Embedded Comment Form. How?

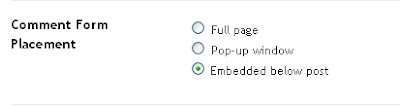
  • Next make sure you click on a radio button next to "Embedded below post". See the screenshot below:
Embedded Comment Form
  • Then go all the way down and click on Save Settings to save your change.
If you are using a Classic template, then you are done. However, it is a little bit tricky if you are using a modified template. Since I am using a modified template - Minima Strentch, I'll show you how I've done it with mine.
  • First login to your Blogger account/Blogger in Draft account; click on Layout/Edit HTML.Layout/Edit HTML
  • Before you make any changes, make sure you backup your template by clicking on Download Full Template. See the screenshot below: Layout/Edit HTML/Backup Template
  • Next click to tick Expand Widget Templates checkbox like the screenshot below: Expand Widget Template
  • Then search for the following code in your New Blogger template HTML editor; hold Ctrl and hit F at the same time ; then copy and paste the following line in the search box to find it.
    <b:include data='post' name='comments'/>

  • Insert the following code right after the above code:
    <b:include data='post' name='comment-form'/>

  • Finally click on Save Template to save your code.
Did you see your inline comment form showing up beneath your posts? If you have any questions, feel free to talk about them in the comment section; and make sure you read the following articles. Especially for How to Add a Comment Form Beneath Your Blog Posts, the author covers other cases as well.

Related articles
New Feature: Embedded Comment Form
How to add a Comment Form Beneath Your Blog Posts

Saturday, June 21, 2008

How to Add a Favicon to Your New Blogger?

What is a favicon? Well, it stands for a favorite icon. It is normally a 16x16 pixels or 32x32 pixels icon that appears next to your URL (web address) of your web browser. Most people prefer to use 16x16 pixels icon. Adding a favicon to you blog/website will no doubt distinguish your blog/website from the millions of other blogs. I've already created one for my WordPress blog. I was wondering how I could get one for my New Blogger blog here. The steps below are showing you how I've created mine on this blog:

  • To add a favicon to your blog/website, you need to have your picture(s) ready on you PC (personal computer). If you don't have one, then you can create your own by using Paint or Photoshop program; or you can create one here from Favicon Generator; then save it to your PC as favicon.ico.
  • If you have your picture(s) ready on your PC, then upload it to FavIcon from Pics; choose either 16x16 pixels or 32x32 pixels; you can preview your favicon on that site. If you are satisfied, then download it to your PC as favicon.ico.
  • Once you have your favicon.ico ready on your PC, you need to upload it to your website's root directory.
  • Since you know you don't have access to your server if you are using Google Blogger, so what can you do now?
  • The solution is to find a third party image hosting to host your favicon.ico. Be aware that most of the Free image hostings don't support .ico format. Still you can find one that supports it. Here is a free image hosting that supports this image format.
  • Once you find one to host your images/pictures; get the link and come back to Blogger Dashboard.
  • Click on Layout/Edit HTML, find <head> line in the HTML editor; it should be at the beginning of the template.
  • Then insert <link href='URL your icon file' rel='shortcut icon' type='image/favicon.ico'/> right after <head> line, where URL your icon file is the link you've got from your third party image host.
  • Save your template and refresh you blog/website to observe the favicon.
It should appear next to your URL in the address bar of your web browser. Any questions? Ask in comments.

Related articles
Favicon for your Blogger blog
Add Favicon icon to Blogger URL
How to Add a Favicon to Your WordPress Blog?

Saturday, May 31, 2008

How to Hide Your New Blogger Navigation Bar?

Navigation bar in New Blogger serves as easy navigation between blogspot blogs. It also allows you to login easily. However, a lot of Google bloggers removed it for the aesthetic purpose. In my opinion, it may take it longer to load your blog too. According to Amit Agarwal, a well known professional blogger from India: "There's some hope now. Google recently organized a road show in select Indian cities to promote their Blogger platform. Ankit attended the event and requested clarity on the navbar policy from the Googlers present at the roadshow. They immediately called up their team based in Google's Bangalore office and confirmed to Ankit that it's legal to hide the navbar."


So if you are interested in hiding yours. The following steps will show you a couple of ways to hide it and it is pretty easy:
  • First login to your Blogger account.
  • Second click on Layout/Edit HTML. See the screenshot below: Layout/Edit HTML
  • Next make sure you back up your template before you go any further. See the screenshot below: Layout/Edit HTML/Backup Template
  • Next holding Ctrl and hit F, copy and paste </head> line in the search box to find it.
  • Then copy and paste one of the following codes right above </head>.
    #Navbar1 {
    margin: 0;
    padding: 0;
    display: none;
    visibility: hidden;
    }

    #navbar #Navbar1 iframe {
    display:none;
    visibility:none;
    }
    div.navbar {
    opacity:0;
    display:none;
    }
    #navbar-iframe{
    height:0px;
    visibility:hidden;
    display:none
    }


    This is how it turned out to be:
    body#layout #sidebar-wrapper,
    body#layout #newsidebar-wrapper {
    width: 150px;
    }

    #Navbar1 {
    margin: 0;

    padding: 0;

    display: none;

    visibility: hidden;

    }


    ]]> </b:skin>
    </head>

  • Finally click on SAVE TEMPLATE button to save it.
I have tried all of them and all of them worked for me. Good luck to you.

Saturday, May 24, 2008

Interesting In Getting a Header Image for Your New Blogger?

I've just added a header image to this blog. What do you think? Adding an image to your header makes your blog quite unique than other people's blogs. So each blog should have its own uniqueness. It is one way that reflects a blogger's personality too. If you are interest in that, then follow the instructions below to get yours up.

  • First you have to have your own image(s) ready either on your PC (personal computer) or on your free hosting website.
  • Second login to your Google Blogger's Dashboard and click on Layout/Edit HTML/. See the screenshot below: Layout/Edit HTML
  • Third find out your header image dimension by searching the following codes from your template editor:
    #header-wrapper {
    width: 930px;
    //it only tells you the width here
    margin:0 2% 10px;
    border:1px solid $bordercolor;
    }

    You can hold Ctrl and hit F at the same time to bring up a search bar. Then copy and paste #header-wrapper { in the search box to find it.
  • Once you found out your header image's width, you need to guess the header image's height; mostly its height is about 140 pixels.
  • Next you need to customize your header image dimension. I use Microsoft Paint which came with my PC to Sketch/Srew the header image. You may use Photoshop if you know how.
  • Then head back to your Blogger's Layout. Click on Edit in your header section. See the screenshot below: Header Image Section
  • A new window will pop up. Type in your blog title, blog description, and browse your customized image here either from your PC or from the web. Choose your placement and make sure you click on Save Changes button to save it. See the screenshot below: Upload Header Image
Now go ahead and check your blog to see how the header image turned out to be. Good luck! If you like this tutorial, then make sure you subscribe to it.

Related articles
Adding Graphic Background to Blog Header
Interested In How to Change Your Header Images?
How to Replace Your Header Image in WordPress.com Blog?

Saturday, May 17, 2008

Get a Trackback Service for Your New Blogger. Learn How?

As you know Google New Blogger doesn't provide a trackback service which is disadvantage in a way that we could not detect who has linked back to us. A trackback is especially used to facilitate communications between two blogs. If both bloggers have a trackback service, then you'll be notified in your comments if any blogger has referred one of your entries in his/her blog.

Using a trackback service effectively will no doubt increase traffic to your blog. Therefore it is worth of using a trackback service in your blog. I've been searching on the Internet trying to find a trackback service that you may consider to use for your Blogger too. Here are some Free online trackback services that allow you to send trackback pings:

  • Simpletracks - Send Trackack pings even if your blogging tool doesn't do Trackback. Javascript must be enabled in your browser.
  • Trackback wizard - Create a manual trackback to alert a blog of your linking to it.
  • Haloscan - A free weblog commenting and trackback system for weblogs and websites.
  • The Wizbang® Tech Trackback Pinger -This form can be used to send a trackback pings to any blog that accepts Trackbacks. You do not need to have a Trackback system on your blog to send pings.


Updated on 2/21/2010: Haloscan will be shutting down on Feb 28, 2010. It seems Echo is taking over. It provides 30 day free trial. After that you'll need to pay $12/year for its service.

Related articles
Haloscan Trackback: What? Why? How?
What’s a Trackback? Permalink? Post slug? Ping?

Saturday, April 26, 2008

How Can You Add A Footer On Your New Blogger?

Google Blogger gives you the freedom of adding your own footer on your blog; not like WordPress.com which already provides a footer that you don't have access to its file to do anything. Adding a footer to your New Blogger is so easy. You don't need to know the HTML to do that. If you like to add a footer on your New Blogger just like mine here, all you need to do is to follow the steps below:

  • Log in to your Blogger's account; it will lead you to the Dashboard.
  • Click on Layout/Edit HTML. Layout/Edit HTML
  • Make sure you back up your template by clicking on Download Full Template: Layout/Edit HTML/Backup Template
  • After that scroll all the way down in your HTML template editor
  • Toward the end of HTML code; you'll see this line </body>
  • Get the footer code below:
    <div class='footer'>
    <div align='center'>
    Copyright &#169; 2007-2008. <a href='http:yourblogname.blogspot.com' title='your blog description goes here'><u>your blog description goes here</u></a>. All rights reserved.
    </div>
    </div>
  • Make sure you change yourblogname to be your own blog name, your blog description goes here to be your own description, and your blog title goes here to be your own blog title
  • Copy and paste the amended code right above the line </body>
  • Save your template
That's all. Now go ahead and check the footer you've just added to your blog. Do you like this tutorial? Don't forget to subscribe! More good stuff will be coming!

Saturday, April 19, 2008

How Can You Post YouTube Video in New Blogger?

Want to post video unit from your Google AdSense account in your new Blogger? Then you come to the right place. I am going to show you how to implement it within your HTML code. If you don't have a Google AdSense account, then you may want to register a Free Google AdSense account here. The following steps will guide you how to implement YouTube video in your new Blogger.

  • Second click on Layout/Edit HTML. See the screenshot below: Layout/Edit HTML
  • Next make sure you back up your template before you do anything. See the screenshot below: Layout/Edit HTML/Backup Template
  • Next holding Ctrl and hit F at the same time; then copy and paste <!-- end content-wrapper --> line in the search box to find it.
  • Then you need to login to your Google AdSense account. Click on AdSense Setup/Video Unit.
  • A new page will show up. Login to your YouTube's account. If you don't have one, then you may want to register a Free YouTube's account here.
  • Then put the code you get from YouTube's account right after <!-- end content-wrapper --> line. It is not done yet!
  • This is the most important step. Therefore pay extremely attention to it: change all < to be &lt; and all > to be &gt;. Customize your video unit code you got from your YouTube's account. See the following example as a reference.
    &lt;div
    amp;quot;_ytplayer_vjVQa1PpcFOVN5OR2kZ8gAAHWMcwMK
    bx8Prz0Rla71U=&quot;&gt;&lt;a href=&quot;
    http://www.youtube.com/browse&quot;&gt;Watch the
    latest videos on YouTube.com
    &lt;/a&gt;&lt;/div&gt;&lt;script
    src=&quot;http://www.youtube.com/cp/vjVQa1PpcFOVN5OR
    2kZ8gAAHWMcwMKbx8Prz0Rla71U=&quot;
    type=&quot;text/javascript&quot;/&gt;
    &lt;/div&gt;
  • Finally save your template and enjoy the work you've done!
You can put your YouTube's code somewhere else too, but I don't want to confuse you today. Do you like this article? Then don't forget to subscribe.

Saturday, April 5, 2008

How to Create a Unique Title Tag for a New Blogger?


Title tag plays the most important role for search engine optimization. Creating a unique title tag for each page of your website or blog will no doubt help you rank well with major search engines such as Google, Yahoo, and MSN ( Micro Soft Network). So let us begin.

  • First login to your Blogger account, click on Layout/Edit HTML. Backup your template by clicking on Download Full Template. See the screenshot below: Layout/Edit HTML/Backup Template
  • Second click to mark off the check box which is next to Expand Widget Templates. Expand Widget Template
  • Next holding Ctrl and hit F to find <title><data:blog.title/></title> line, and replace the following code with this line. It allows you to swap your post title with your blog title. Your title tag will look like post title | blog title; thus achieving search engine optimization.

  • <b:if cond='data:blog.pageType == "item"'>
    <b:section id='swaptitle'>
    <b:widget id='Blog2' locked='false' title='Blog Posts' type='Blog'>
    <b:includable id='nextprev'/>
    <b:includable id='backlinks' var='post'/>
    <b:includable id='post' var='post'>
    <title>
    <data:post.title/> - <data:blog.title/>
    </title>
    </b:includable>
    <b:includable id='commentDeleteIcon' var='comment'/>
    <b:includable id='status-message'/>
    <b:includable id='feedLinks'/>
    <b:includable id='backlinkDeleteIcon' var='backlink'/>
    <b:includable id='feedLinksBody' var='links'/>
    <b:includable id='postQuickEdit' var='post'/>
    <b:includable id='comments' var='post'/>
    <b:includable id='main' var='top'>
    <b:loop values='data:posts' var='post'>
    <b:include data='post' name='post'/>
    </b:loop>
    </b:includable>
    </b:widget>
    </b:section>
    <b:else/>
    <title><data:blog.pageTitle/></title>
    </b:if>

    If the above code works then you are half-way done! I use Minima Stretch template. It would not allow me to save the code. An error kept showing up"Your template is invalid because the tag 'b:section' appears inside of the tag 'head'."; so I have to insert the code above <head>; which works fine for me.
  • Next holding Ctrl and hit F again to find <b:include data='blog' name='all-head-content'/> line, and place the following code right after it. It adds meta description and meta keywords to your blog.
    <b:if cond='data:blog.url == "http://yoursitename.com/"'> <meta content='Your title tag description for your blog goes here.' name='description'/> <meta content='Your keywords for your blog go here.' name='keywords'/> </b:if>

    You probably already know that the above code is for your main page title. Make sure you change http://yoursitename.com/ to be your own url; add your own meta description in <meta content='Your title tag description for your blog goes here.' name='description'/> and type in your own keywords in <meta content='Your keywords for your blog go here.' name='keywords'/>.
  • Every time when you create a new post, you must add the following new code right after the above one. You will not know the url of your post until you publish it. You'll have to do the same procedure as above:
    <b:if cond='data:blog.url == "http: //yoursitename.com/2008/03/yourpostname.html"> <meta content='Your title tag description for your post goes here.' name='description'/> <meta content='Your keywords for your post go here.' name='keywords'/> </b:if>

    Changing http://yoursitename.com/2008/03/yourpostname.html to be your own url of your post, adding your own meta description in <meta content='Your title tag description for your post goes here.' name='description'/> and type in your own keywords in <meta content=Your keywords for your post go here.' name='keywords'/>. By doing these editions, you will create a unique title tag, a unique description, and unique keywords for your individual post.
You are done! You can check out some of my posts in this blog. Do you notice that each post of this blog has its own unique title tag showing up on the title bar? Now go head and check out your blog too. Feel free to leave your comment in this post so that other people can learn from it further. Good luck to all of you!

Update: Although the above method works for me, it is too much trouble to add a title and description each time after posting a new article. There is a better way to optimize your New Blogger. See this article to find out how: How to Change Title Tags for Your Blog.

Search

Custom Search